The key to effective night safety lighting in a UK home isn’t a simple choice between wired or battery power; it’s about designing a reliable, low-impact system that works with your solid walls, not against them.
- Prioritise low-level, continuous light paths (like LED strips) over single bright, overhead lights to avoid disorientation and preserve night vision.
- Use occupancy sensors, not basic PIRs, in bathrooms to prevent the lights from switching off at inconvenient moments.
- Solving false triggers from pets or drafts involves strategic sensor placement and simple physical masking, not expensive ‘pet-immune’ technology.
Recommendation: Focus on a layered system of modern, efficient battery-powered LED strips and strategically placed occupancy sensors. This approach provides robust safety without the cost and disruption of chasing wires into masonry.
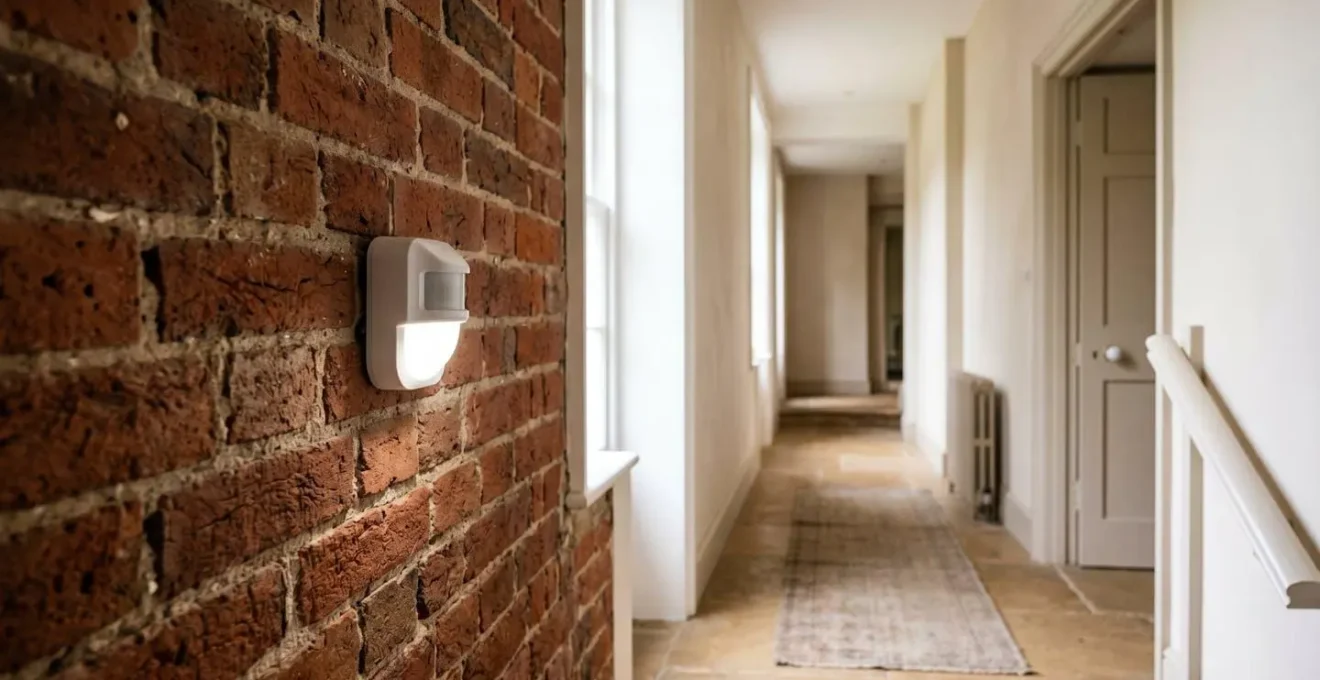
That middle-of-the-night trip to the bathroom is a universal experience, but in a dark house, it’s a journey fraught with risk. You stumble out of bed, disoriented, fumbling for a light switch that’s never quite where you remember it. For many homeowners, especially those living in older UK properties with solid brick walls, the common solutions are inadequate. Leaving a hallway light on all night wastes electricity, and cheap plug-in night lights offer a dim, unreliable glow that can create more shadows than safety.
The conversation often turns to motion-sensor lighting, which immediately brings up the core dilemma: wired vs. battery. The standard thinking is that wired is reliable but impossible to retrofit without chasing channels into plaster and brickwork—a dusty, expensive mess. Battery-powered options seem easy but raise concerns about reliability and constantly changing batteries. This binary choice, however, misses the point entirely.
The real secret to creating a safe, automated lighting path in your home isn’t about the power source. It’s about a smarter, more strategic approach. It’s about understanding the failure points of common systems and designing a solution that provides light exactly where and when it’s needed, without false triggers or sudden blackouts. It’s about leveraging modern, low-impact technology like floor-level LED strips and advanced sensors that can be installed with minimal disruption, even in a Victorian terrace.
This guide moves beyond the generic advice. It provides the practical, on-the-ground knowledge of a retrofit specialist to help you build a lighting system that enhances safety and independence, without tearing your home apart. We will break down the critical decisions, from sensor types and placement to avoiding common mistakes that could compromise the entire system.
Explore the following sections to understand how to design and implement a motion-activated lighting system that is both effective and practical for your home. Each part addresses a critical real-world problem and provides a clear, actionable solution.
Summary: A Practical Guide to Motion-Sensor Lighting in UK Homes
- Why a lighted path from bed to toilet prevents 30% of night falls?
- How to set sensor duration so the lights don’t go out while you’re on the toilet?
- Plug-in night lights vs Ceiling sensors: what works for a long hallway?
- The sensitivity error that wakes you up every time the cat walks by
- Where to place the sensor to detect motion before you step onto the stairs?
- How to prevent wandering triggers without making the home look like a prison?
- The « daisy chain » mistake that causes electrical fires in old sockets
- Carbon Monoxide and Fire: why standard alarms are not enough for deep sleepers?
Why a lighted path from bed to toilet prevents 30% of night falls?
The most significant danger during nighttime movements isn’t just the darkness; it’s the abrupt transition from sleep to wakefulness combined with poor visibility. When you first get out of bed, your balance can be unsteady and your eyes are not adjusted to the dark. A single, bright overhead light can be blinding, causing temporary disorientation and destroying your natural night vision. This is where a continuous, low-level ‘pathway of light’ makes a profound difference, acting as a gentle guide rather than a jarring spotlight.
The data on this is compelling. A well-designed lighting system does more than just illuminate; it actively prevents accidents. A 2024 randomized crossover trial confirmed that an improved lighting intervention resulted in a 34% lower fall incidence density among participants. This isn’t just about adding more light; it’s about adding the right kind of light in the right places—specifically, a clear, unobstructed path from the bedroom to the bathroom.
Beyond the physical prevention of falls, such a system significantly reduces the fear of falling. A study on automated LED guiding lights found that 57% of seniors reported positive effects on their fear of falling, noting improvements in vision and reduced anxiety. By creating a predictable and safe environment, a motion-activated light path empowers independence and builds confidence. The goal is to create a seamless river of warm, low-level light that activates before you take your first step, guiding you safely without disrupting your sleep state too much.
How to set sensor duration so the lights don’t go out while you’re on the toilet?
There is nothing more frustrating—and potentially dangerous—than being plunged into darkness while you are still using the bathroom. This common failure happens because most basic motion sensors are not designed for spaces where you remain relatively still. A standard PIR (Passive Infrared) sensor is looking for significant movement. When you are sitting, it assumes the room is empty and dutifully switches off the lights, forcing you to wave your arms frantically to bring them back on.
The solution is not to set an excessively long timer. The professional solution is to use the right type of sensor for the job: an occupancy sensor. Unlike a basic motion sensor, an occupancy sensor is designed to detect continued presence, not just initial movement. It continuously resets its timer as long as it detects body heat or micro-movements, ensuring the light stays on for as long as you are in the room. For a bathroom environment, this is a non-negotiable feature.
The following table, based on specifications for modern UK-rated sensors, breaks down the critical differences. As shown by data from retailers like those specialising in IP-rated bathroom electronics, the features are distinct.
| Feature | Traditional PIR Motion Sensor | Occupancy Sensor (Recommended) |
|---|---|---|
| Timer Reset Behavior | Timer starts once, requires large movement to re-trigger | Timer continuously resets while presence is detected |
| Detection Method | Detects motion only (large body movements) | Detects body heat continuously, including micro-movements |
| Typical Duration Range | 30 seconds – 5 minutes | 10 seconds – 40 minutes (adjustable in steps) |
| Risk of Light Shutoff While Seated | High – requires waving hands to reactivate | Low – maintains detection of stationary presence |
| Installation Example (UK) | Basic PIR wall switch | IP44/IP65 ceiling occupancy sensor (bathroom-rated) |
| Cost Range (UK Market) | £15-£30 | £25-£60 |
When installing, always opt for a ceiling-mounted 360° occupancy sensor. It provides superior coverage in a confined space compared to a wall-mounted unit. Start with a timer duration of at least 5-7 minutes. This provides a good buffer, and if you find it still times out, you can increase it. The key is that with an occupancy sensor, the timer is a fallback, not the primary mechanism keeping the lights on.
Plug-in night lights vs Ceiling sensors: what works for a long hallway?
Long hallways present a unique challenge. A single light source, whether from a ceiling fixture or a plug-in night light, is rarely sufficient. A ceiling sensor at one end may not detect you until you are halfway down the corridor, and a single plug-in light creates isolated pools of brightness surrounded by deep, disorienting shadows. This setup can be more hazardous than complete darkness, as your eyes struggle to adjust constantly.
The most effective and safest solution for a long hallway is to abandon the idea of a single point of light. Instead, you should create a continuous, linear path of illumination. This is where modern, battery-powered LED strip lighting excels, especially in homes with masonry walls where running new wires is impractical. These flexible strips can be run along the entire length of the baseboard, providing an unbroken, low-level guide. They illuminate the floor, showing the path and any potential obstacles without causing glare.
For optimal coverage with individual lights, fall prevention specialists recommend that wall-mounted lights should be placed every 6-8 feet to create overlapping fields of light. However, this often requires multiple battery-powered units, which means more batteries to change. A single, high-quality LED strip system, often sold in kits with its own motion sensors for each end of the hallway, provides a more elegant and integrated solution. It’s the ultimate ‘low-impact’ installation: high on safety, low on disruption.
The sensitivity error that wakes you up every time the cat walks by
A common complaint about motion sensors is false triggering. You invest in a system for safety, only to have it wake you up because the cat decided to go for a midnight wander, or a draft from under a door caused a curtain to move. Many people assume the only solution is to buy expensive ‘pet-immune’ sensors, but for low-level lighting, a far simpler and more effective technique exists: sensor masking.
A PIR sensor works by detecting changes in infrared energy across different zones in its field of view. The sensor’s lens is a Fresnel lens, divided into multiple facets, each looking at a specific slice of the room. The trick is to physically block the facets that look at the floor level, where pets roam, while leaving the upper facets clear to detect a person walking upright. This creates a deliberate ‘blind spot’ for small animals.
This is a practical, hands-on adjustment that any homeowner can do. It doesn’t require complex electronics, just a small piece of opaque tape and a bit of patience. By customising the sensor’s vision to your specific home and pets, you can achieve a highly reliable system without the extra cost of specialised hardware. It’s a perfect example of a pragmatic retrofit solution.
Action Plan: Eliminate Pet False Triggers with Sensor Masking
- Identify the pet’s typical movement height by observing where your cat or dog’s main body mass is when walking through the detection zone.
- Activate the sensor’s ‘walk test’ mode. If it doesn’t have one, simply watch the indicator light to see which zones trigger when the pet walks by at different distances.
- Use a small piece of electrical tape or specialised lens masking material to carefully cover the lower portion of the PIR sensor’s Fresnel lens.
- Start by masking the bottom 30-40% of the lens for small pets (e.g., under 7kg) or the bottom 20% for medium-sized pets. This creates a blind spot at floor level.
- Test thoroughly by having the pet walk through the space while you verify no false triggers occur. Crucially, then walk through yourself to ensure the sensor still activates reliably for a person.
Where to place the sensor to detect motion before you step onto the stairs?
Stairs are one of the most high-risk areas in any home. A fall here can have severe consequences. The goal of stair lighting is not just to illuminate the steps, but to do so before a person commits their weight to the first step. Activating the light at the exact moment someone steps onto the stairs is too late; the surprise can itself cause a stumble. This is why sensor placement at the top and bottom of stairs is a matter of precision.
The fundamental rule is to position the sensor to detect the approach, not the arrival. Research has repeatedly shown the dangers of poor home lighting; a WHO study found that participants reporting inadequate light had 2.5 times higher odds of falling. You want the sensor to trigger when a person is at least a full stride—or about three feet—away from the first tread. This provides enough time for the lights to come to full brightness and for the person’s eyes to register the change.
Here are the professional rules for stairway sensor placement:
- Top of Stairs: Mount the sensor on the landing wall, aimed across the path of approach. Never aim it directly at a bedroom door, as a person turning over in bed could trigger it. The ideal placement is perpendicular to the direction of travel towards the stairs.
- Bottom of Stairs: Install the sensor in the adjacent hallway or at the base, again aimed across the walking path leading to the stairs. Never aim the sensor directly up the staircase, as this can lead to missed triggers or late activation.
- Avoid ‘Back-lighting’: Ensure no bright light sources, like a window or another light fixture, are in the sensor’s direct line of sight. This can « blind » a PIR sensor, preventing it from detecting motion effectively.
- Couple with Step Lights: While a sensor triggers the main light, consider adding low-profile LED step lights or illuminated nosings. These define the edge of each individual step, drastically improving safety.
How to prevent wandering triggers without making the home look like a prison?
For family members caring for a person with dementia or a tendency to wander, safety alerts are crucial. However, the need for security can often conflict with the desire to maintain a warm, dignified home environment. The solution is not to install clunky, institutional-looking alarms and barriers. Modern technology allows for incredibly discreet monitoring that provides peace of mind without turning a home into a fortress.
The key is integration and subtlety. Instead of large, obvious sensors, you can use tiny, wireless door and window contact sensors. These devices are often no larger than a piece of chewing gum and come in various colours to blend seamlessly with your door frames and window sills. When a door or window is opened, the sensor sends a silent notification to a caregiver’s phone or a discreet chime unit in another room, rather than sounding a loud, distressing alarm in the space itself.
This approach shifts the focus from preventing exit to being aware of it. It provides the critical window of time needed to respond, while respecting the individual’s freedom of movement within their home. These systems can also be programmed with time-based rules, for example, only sending an alert if the front door is opened between 10 PM and 6 AM. By choosing technology that is designed to be invisible, you can maintain a high level of safety while preserving the feeling of home, not a high-security facility.
Key Takeaways
- A continuous, low-level light path is safer and more effective than single, bright overhead lights for nighttime navigation.
- In bathrooms, always use an occupancy sensor, not a standard PIR motion sensor, to prevent lights from turning off while the room is still occupied.
- For long hallways in solid-walled homes, battery-powered LED strips along the baseboard are a superior solution to both plug-in lights and wired ceiling fixtures.
The « daisy chain » mistake that causes electrical fires in old sockets
While installing new lighting, it’s easy to focus on the fixtures and forget about the source of the power. This is particularly dangerous in older UK homes, where the wiring may not have been updated in decades. A common and extremely hazardous mistake is « daisy-chaining »—plugging one extension lead or multi-socket adapter into another to get more outlets. This is a recipe for disaster.
Each wall socket is designed to deliver a maximum amount of power (typically 13 amps in the UK). When you daisy-chain adapters, you aren’t creating more power; you are creating a bottleneck. The total load of all the devices you plug in is drawn through the single cable of the first extension lead and the wall socket itself. If this load exceeds 13 amps, the lead’s cable and the socket’s internal wiring can overheat dramatically, melting the plastic and potentially igniting a fire inside the wall or behind furniture.
This is not a theoretical risk. Overloaded sockets are a leading cause of electrical fires in homes. The wiring in older homes can be particularly vulnerable, with brittle insulation and worn-out socket components. Never, under any circumstances, should you plug an extension lead into another extension lead. If you need more outlets, the only safe solution is to have a qualified electrician install additional wall sockets. For temporary needs, using a single, high-quality surge-protected power strip plugged directly into the wall is the safer choice, but it is not a permanent solution for a lack of outlets.
Carbon Monoxide and Fire: why standard alarms are not enough for deep sleepers?
A comprehensive home safety plan extends beyond lighting. While preventing falls is critical, protecting against the invisible dangers of fire and carbon monoxide (CO) is equally vital. Standard smoke and CO alarms are essential and legally required in many situations, but they have a critical weakness: they rely on an audible alert that a person must be able to hear and react to, even from a deep sleep.
For many older adults, deep sleepers, or those with hearing loss, a standard 85-decibel alarm may not be sufficient to wake them. The high-frequency sound of a typical alarm can be difficult for people with age-related hearing loss to perceive. This means that even with working alarms, a person could sleep through the crucial early moments of an emergency.
For this reason, a layered alarm system is the professional recommendation. This involves upgrading from standalone, battery-operated units to an interconnected system. When one interconnected alarm detects smoke or CO, all alarms in the house sound simultaneously, significantly increasing the chances of waking everyone. For those who are hard of hearing, the system can be enhanced even further with specialised devices:
- Strobe Light Alarms: These devices emit a high-intensity flashing light in addition to the audible alarm, providing a powerful visual alert.
- Bed Shaker Devices: These units are placed under a mattress or pillow and vibrate vigorously when the alarm is triggered, providing a tactile alert that is impossible to ignore.
These systems ensure that alerts are delivered through multiple sensory channels—sound, sight, and touch—providing a much more robust safety net than a simple beeping alarm.
Ultimately, creating a truly safe home involves a holistic assessment of all potential risks, from lighting and electrical loads to fire detection. If you have concerns about the safety of your home’s electrical systems or want to implement a truly effective, layered safety solution, the next logical step is to seek a professional evaluation. An experienced electrician can assess your specific needs and provide a tailored plan that ensures safety, security, and peace of mind.