The critical distinction for any UK home adaptation is not whether you need approval, but which specific statutory framework—Planning Permission or Building Regulations—governs the work, as they address entirely different legal and safety concerns.
- Planning Permission assesses the external impact of your project on the neighbourhood and environment.
- Building Regulations ensure the work itself is structurally sound, safe, and meets standards for accessibility and fire protection.
Recommendation: Before committing to any works, your first step must be to determine if the adaptation affects the building’s structure or external appearance, as this dictates the required approval route.
When the need for significant home adaptations arises, often with urgency following a hospital discharge or a change in mobility, homeowners are plunged into a complex world of compliance. You are told to « check with the council, » but this advice is unspecific. The terms ‘Planning Permission’ and ‘Building Regulations’ are used interchangeably, creating a fog of confusion that can lead to illegal works, costly rectifications, or rejected applications for financial aid. The common assumption is that these are two names for the same bureaucratic hurdle.
This is a fundamental and dangerous misunderstanding. These are not interchangeable terms; they are two separate legal frameworks, overseen by different departments, asking entirely different questions. Planning Permission is concerned with the principle of development and its impact on the wider community—the look of a street, the effect on neighbours. Building Regulations, administered by Building Control, are concerned with the technical specifics of construction—is the work structurally sound, is it fire-safe, is it energy-efficient, and does it meet health and safety standards?
The key to navigating this system without draining your life savings or sanity is to stop seeing it as a single checklist. Instead, you must learn to think like an assessor: to understand the *structural and legal reasoning* behind why a certain adaptation falls under one regime, the other, or, as is often the case, both. This understanding empowers you to anticipate requirements, instruct professionals correctly, and build a case for financial support that is compliant from the outset.
This guide will deconstruct the most common structural adaptations required for ageing in place or disability access. For each scenario, we will clarify the specific regulatory obligations, moving beyond simple checklists to explain the underlying principles of structural integrity and statutory compliance that govern these essential modifications.
Summary: Navigating Planning Permission and Building Regulations for Home Adaptations
- Why you must consult a structural engineer before installing a ceiling track hoist?
- How to reinforce timber joists for a level-access shower tray?
- Brick extension vs Modular Pod: which is faster for urgent hospital discharge?
- The ramp gradient error that makes your front access illegal and dangerous
- How to install « knock-out » panels now for a future through-floor lift?
- How to apply for a Disabled Facilities Grant (DFG) without getting rejected?
- How to plan ageing in place in the UK without draining your life savings?
- Concrete or Modular: Which ramp suits a steep UK driveway best?
Why you must consult a structural engineer before installing a ceiling track hoist?
The installation of a ceiling track hoist is not a simple DIY task or a minor alteration; it is a significant structural intervention that falls squarely under the remit of Building Regulations. Planning Permission is irrelevant here as the work is internal. The primary concern is ensuring the existing ceiling structure can safely support the dynamic, concentrated loads imposed by the hoist and its user. Standard domestic ceiling joists are designed to support distributed, static loads (like plasterboard and insulation), not a moving point load that can weigh hundreds of kilograms.
A structural engineer’s role is non-negotiable. They must perform calculations to verify that the load capacity is sufficient. The forces at play are significant; according to industry installation standards, a 1.5x multiplier is applied to the hoist’s safe working load for testing. This means a 260kg hoist must be supported by a structure capable of handling at least 390kg. An engineer will assess the size, spacing, and condition of your existing timber joists to determine if they meet the minimum requirements, or if reinforcement is needed.
Failure to obtain this professional sign-off exposes the user to catastrophic risk and renders the installation non-compliant with Building Regulations. The necessary structural specifications are precise and depend on the system’s weight and the building’s construction. The following points illustrate the level of technical detail required:
- Minimum Timber Size: For standard overhead hoists using existing joists, the timber must be at least 6×2 inches (approx. 150mm x 50mm). For heavier 200kg systems, joists should be a minimum of 100mm x 100mm.
- Fixing Method: Fixings like coach bolts must be secured directly into the centre of the joists, not just the plasterboard.
- Load Spreading: The preferred and safest method often involves installing metal Unistrut beams or load-spreading timber beams in the roof space, which span across multiple joists to distribute the weight more effectively.
- Concrete Ceilings: Fixings cannot be made to a suspended ceiling grid. They require specialist drop-in anchors drilled directly into the concrete slab above.
- Lateral Bracing: If there is a significant void (over 200mm) between the primary fixing point and the finished ceiling, lateral bracing must be installed to prevent movement and ensure stability.
Ultimately, the responsibility for ensuring structural integrity rests with the homeowner. Engaging a structural engineer is the only way to meet this statutory obligation and guarantee user safety.
How to reinforce timber joists for a level-access shower tray?
Creating a true level-access or « walk-in » shower is a highly desirable adaptation for mobility, but it presents a significant structural challenge. To sink the shower tray flush with the surrounding floor, it is almost always necessary to cut or « notch » the timber floor joists beneath. This action, while seemingly minor, compromises the structural integrity of the floor and is strictly controlled by UK Building Regulations. This is another area where Planning Permission has no jurisdiction; the focus is entirely on safety and compliance under Building Control.
When a joist is notched to accommodate plumbing or the tray itself, its ability to carry load is substantially reduced. This can lead to a spongy or sagging floor, cracked tiles, and in extreme cases, partial floor collapse. As stated within the principles of UK Building Regulations, any modification that could affect the structural stability of the building requires approval. Specifically, Approved Document A (Structure) provides guidance on how and where joists can be drilled or notched without compromising safety.
To counteract this weakening, the joists must be reinforced. This is typically done by fixing new timbers (known as trimmers or noggins) alongside or between the cut joists to transfer the load to the adjacent, uncut joists. The exact method and size of reinforcement timber must be specified by a competent person, often a structural engineer or an experienced builder who can demonstrate compliance with the regulations.
The image above illustrates the kind of robust connection required to restore structural integrity. The goal is to create a rigid frame around the opening for the shower tray, ensuring that the floor remains as strong as it was before the joists were altered. Without this critical reinforcement, the installation is not only unsafe but also fails to meet statutory compliance, which can cause significant issues when selling the property.
Brick extension vs Modular Pod: which is faster for urgent hospital discharge?
When an urgent need for accessible ground-floor facilities arises, such as for a hospital discharge, the choice of construction method has profound implications for both timeline and regulatory pathway. The decision between a traditional brick-and-mortar extension and a prefabricated modular pod is a clear example of how Planning Permission and Building Regulations interact differently depending on the nature of the work.
A traditional brick extension is, by definition, a permanent alteration to the property. It changes the building’s footprint and external appearance, meaning it will almost certainly require full Planning Permission—a process that can take months. It will also be subject to multiple site inspections by Building Control at various stages (foundations, superstructure, insulation, etc.) to ensure it meets all relevant Building Regulations. While considered the « gold standard, » this route is rarely fast enough for urgent needs.
Modular pods, by contrast, are constructed off-site in a factory and delivered for installation. This dramatically accelerates the build time. More importantly, from a regulatory standpoint, they can sometimes be argued to be a « temporary structure » or even fall under similar rules to a caravan, potentially avoiding the need for full Planning Permission. This is especially true if the pod is not permanently fixed to the ground and can be removed in the future. However, it is crucial to note that they must still comply with Building Regulations for aspects like electrical safety, insulation, and drainage connections, though pre-certification of the pod can streamline this approval.
This table summarises the key differences from a regulatory and practical perspective:
| Factor | Brick Extension | Modular Pod |
|---|---|---|
| Typical Build Time | 6-12 months (including planning) | 6-12 weeks (off-site construction) |
| Planning Permission | Full planning permission typically required | May qualify as temporary structure; potentially exempt or simplified process |
| Building Control Sign-off | Multiple inspection stages required | Pre-certified units streamline approval |
| Groundworks Required | Extensive foundations, drainage connections | Minimal; can be placed or attached with reduced groundwork |
| Adaptability | Permanent; difficult to modify or remove | Can be expanded, reconfigured, or removed as needs change |
| DFG Perception | Viewed as permanent solution | Cost-effective; councils may favour for budget reasons |
Case Study: The Role of Modular Housing in Spinal Cord Injury Discharge
Research by Aspire, a UK charity supporting individuals with spinal cord injury, reveals that a shocking 20% of people with SCI are discharged from hospital into unsuitable accommodation like care homes, simply because their own homes are not accessible. Modular pods have been identified as a key solution to this crisis. These off-site constructed units can be rapidly deployed and configured as bespoke wet rooms or bedrooms, allowing individuals to return to their family homes and communities. As highlighted in an analysis by Weightmans law firm, their adaptable and removable nature makes them a cost-effective and practical solution that prevents forced relocation and supports rehabilitation.
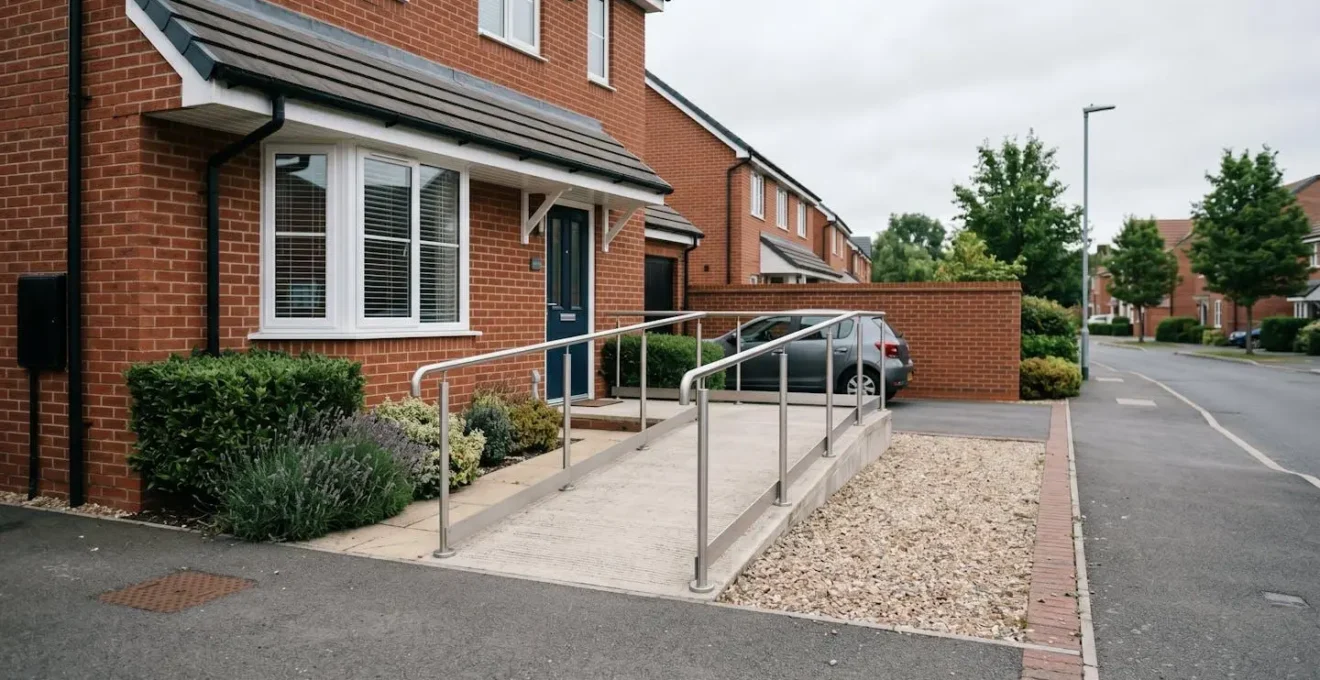
The ramp gradient error that makes your front access illegal and dangerous
The installation of an access ramp is one of the most common disability adaptations, yet it is fraught with regulatory complexities where both Planning Permission and Building Regulations can apply, often in confusing ways. A critical error is to assume that if a ramp doesn’t need Planning Permission, it is automatically compliant. This is incorrect and dangerous.
Planning Permission is concerned with how the ramp affects the property’s external appearance and the surrounding area. A small, discreet ramp at the rear of a property may fall under « Permitted Development » rights and not require a formal application. However, a large ramp at the front of a house, visible from the street, is likely to require full Planning Permission as it impacts the public street scene. The local planning authority will assess its visual impact.
Independently of this, the ramp’s design and construction are governed by Building Regulations, specifically Approved Document M (Access to and use of buildings) and British Standard BS 8300. These regulations are not about aesthetics; they are about safety and usability. The most common and dangerous error is an incorrect gradient. A ramp that is too steep is difficult and hazardous for a wheelchair user to navigate independently and poses a risk for carers. A ramp may receive planning consent but be illegal under Building Regulations if its gradient, width, landings, or handrails are non-compliant.
The correct gradient depends on the length of the ramp. For most domestic situations, a gradient of 1:12 is the maximum recommended, but a gentler slope of 1:15 or 1:20 is always preferable. Achieving this often requires a much longer ramp than homeowners anticipate, which in turn has a greater visual impact and reinforces the need to consider the planning implications. As noted by building compliance experts, Approved Document M and BS 8300 both govern ramp standards, and understanding which applies to your specific dwelling is crucial for ensuring statutory compliance and, most importantly, user safety.
How to install « knock-out » panels now for a future through-floor lift?
Future-proofing a home for changing mobility needs is a financially astute strategy. One advanced technique is to prepare the structural opening for a future through-floor lift during an initial renovation, concealing it with a temporary « knock-out » panel. This is an entirely internal, structural matter governed exclusively by Building Regulations. Planning Permission is not a factor. The objective is to complete all disruptive structural work upfront, so that installing the lift later becomes a much simpler, cleaner, and cheaper process.
However, this is not as simple as cutting a hole and covering it with plasterboard. The process requires meticulous attention to several parts of the Building Regulations to be compliant. Firstly, the structural opening itself must be properly formed. This involves cutting the existing floor joists and installing new trimmer and header joists to frame the aperture, transferring the floor loads safely to the surrounding structure. This requires a structural engineer’s calculations and must be signed off by Building Control.
Secondly, and just as importantly, the temporary infill panel must meet the requirements of Approved Document B (Fire Safety). The floor between two storeys acts as a crucial fire barrier. The knock-out panel must maintain this fire separation, typically for at least 30 minutes. This means using specific materials, such as a double layer of fire-rated plasterboard, combined with appropriate insulation. A simple piece of standard plasterboard would create a dangerous and non-compliant breach in the building’s fire integrity. The installation must be executed in a way that it is structurally independent but aesthetically seamless, ensuring it does not raise red flags on future building surveys or mortgage valuations. Documenting the purpose of the panel with Building Control from the outset is key to a smooth process.
A compliant future-proofing installation for a through-floor lift involves a clear, documented process:
- Frame the structural opening correctly: Install trimmer joists and headers to be lift-ready from the outset, based on formal structural calculations.
- Ensure fire separation compliance: The temporary knock-out panel must meet the specific fire resistance requirements laid out in Approved Document B.
- Specify the correct materials: Use certified fire-rated board, not standard plasterboard, often combined with acoustic insulation for the temporary infill.
- Isolate the structure: The panel must be structurally independent from the surrounding floor to allow for easy removal, while remaining aesthetically seamless.
- Consider future surveys: The design and documentation should pre-empt and satisfy questions that may arise during future mortgage valuations or property surveys.
- Notify Building Control: It is imperative to document the future-proofing intent with the local authority’s Building Control department and obtain formal sign-off for the temporary solution.
How to apply for a Disabled Facilities Grant (DFG) without getting rejected?
Securing a Disabled Facilities Grant (DFG) is a critical pathway for funding essential adaptations, but the application process is often misunderstood. The DFG is not a planning or building control approval; it is a means-tested grant administered by your local council’s housing or social services department. However, its approval is contingent on the proposed works being deemed essential, and those works must subsequently gain all necessary Planning Permission and Building Regulations approvals. A successful DFG application is therefore a strategic exercise in aligning proven need with compliant, cost-effective solutions.
The UK government has recognised the growing need, with a DFG funding allocation of £711 million for 2025-26. Despite this, councils operate under tight budgets and must follow strict legal tests. An application is often rejected not on the basis of the disability, but because the submitted proposal is not seen as ‘necessary and appropriate’ or ‘reasonable and practicable’. For instance, proposing a £50,000 extension when a £15,000 internal reconfiguration could achieve a similar outcome is likely to be rejected. This is set against a backdrop where, as reported in a UK Parliament Committee inquiry, a mere 7% of homes in England have even basic accessibility features, highlighting the scale of the challenge.
The key to a successful application is to build a « bulletproof » case before submission. This involves a proactive, documented approach that anticipates the council’s assessment criteria. The Occupational Therapist’s (OT) report is the cornerstone of this process. It is imperative that the OT’s recommendations explicitly use the language of the legal tests, clearly demonstrating why the proposed works are the most reasonable and appropriate solution to meet the identified needs.
Your Action Plan: DFG Application Pre-Submission Audit
- Preliminary Investigation: Thoroughly research your specific local council’s DFG policies and statutory funding limits (£30,000 in England, £36,000 in Wales, £35,000 in NI). Review their published precedents and discretionary powers.
- Evidence Collation & Alignment: Obtain a detailed Occupational Therapist (OT) assessment. Work with the OT to ensure their recommendations explicitly align with the legal tests of being ‘necessary and appropriate’ and ‘practicable’ to meet the applicant’s needs.
- Financial Preparation: The DFG is means-tested for adults. Proactively gather all required financial documentation and identify all disability-related expenditures that can be legitimately offset against income to present an accurate financial picture.
- Proposal Submission: Compile all evidence—OT report, financial documents, and initial quotes for the work—into a comprehensive package. Be aware of council budget cycles and potential waiting lists that may affect processing times.
- Review and Justification: Be prepared for the council to scrutinise the proposal. Your documentation must robustly justify why the chosen adaptation is the most cost-effective and suitable solution, pre-empting any potential queries or challenges.
How to plan ageing in place in the UK without draining your life savings?
The concept of « ageing in place » is appealing, but the prospect of funding major structural work can be daunting. A strategic, phased approach to adaptations is the most financially sustainable way to prepare a home for future needs without liquidating assets. This involves categorising adaptations over a 1, 5, and 10-year timeline, aligning expenditure with the urgency of need and the availability of funding mechanisms like the Disabled Facilities Grant (DFG).
In the immediate term (Year 1), the focus should be on low-cost, high-impact changes. These are often minor works that do not require Building Regulations approval or Planning Permission. This category includes installing grab rails in hallways and bathrooms, improving lighting to reduce trip hazards, adding non-slip flooring, and replacing standard taps with easier-to-use lever-handle taps. Many local councils offer a « handyperson service » that can provide and install these minor adaptations for free or at a very low cost for eligible residents.
The medium-term plan (Years 2-5) should address more significant adaptations that may require professional installation and Building Regulations approval. This is the stage where you might consider installing a level-access shower, a stairlift, or widening internal doorways. These works are often eligible for DFG funding, so a key part of this phase is to apply for an Occupational Therapist (OT) assessment early, even if the need isn’t immediate. This gets you onto the waiting list and starts the formal process for securing financial support.
The long-term plan (Years 6-10) covers major structural work. This could include a through-floor lift, a ground-floor bedroom and bathroom extension, or the installation of a modular pod. These are the most expensive adaptations but also carry the highest priority for DFG funding if a clear clinical need is established. Crucially, homeowners should also be aware of significant cost-saving measures available. For instance, according to UK VAT relief regulations, most building works for disabled adaptations can be zero-rated for VAT. This provides an immediate 20% saving on both materials and labour, a substantial reduction that should be factored into any financial plan.
Key takeaways
- Building Regulations govern how you build safely, focusing on structural integrity, fire safety, and accessibility standards.
- Planning Permission governs what and where you build, assessing the external appearance and impact on the neighbourhood.
- A Disabled Facilities Grant (DFG) is approved based on proven need, but the funded works must still gain all necessary statutory approvals independently.
Concrete or Modular: Which ramp suits a steep UK driveway best?
Choosing the right type of ramp for a steep UK driveway is a complex decision that sits at the intersection of practicality, cost, and regulatory compliance. The choice between a permanent concrete ramp and a semi-permanent modular system is not just about materials; it dictates fundamentally different approaches to Planning Permission and Building Regulations. A steep site exacerbates these differences, often making one option viable and the other impossible.
A permanent concrete ramp is a substantial civil engineering work. On a steep drive, achieving a compliant gradient (e.g., 1:12) requires a very long ramp, which may need to snake or « switchback » to fit. This large, permanent structure will almost certainly require full Planning Permission due to its visual impact. It also requires extensive groundwork and weeks of construction and curing time. While durable, it is an irreversible alteration to the property.
A modular ramp system, typically made from steel and GRP (Glass Reinforced Plastic), offers far greater flexibility. Its key advantage on a steep site is the ability to create complex switchback configurations in a tight space to achieve a compliant gradient where a straight concrete ramp would be impossible. From a regulatory perspective, modular systems are often considered non-permanent fixtures. This can be a powerful argument to a planning officer that the work constitutes « Permitted Development, » potentially avoiding the need for a full planning application. As Enable Access, a compliance specialist, notes: » Shallower slopes reduce strain and improve safety, » and modular systems excel at achieving this on difficult sites. Furthermore, they are removable, which can preserve property value for future sale.
The following table directly compares the two options in the context of a challenging UK driveway:
| Factor | Concrete Ramp | Modular GRP Ramp |
|---|---|---|
| Achieving Compliant Gradient (1:12 or 1:15) | Requires significant footprint; often impossible on narrow steep driveways | Switchback configuration possible; achieves compliant gradient in tight spaces |
| Slip Resistance (UK Weather) | Brushed concrete can be slippery when wet or icy | GRP (Glass Reinforced Plastic) surfaces offer superior slip-resistance in wet/icy British conditions |
| Planning Permission | Typically considered permanent alteration; may require full planning permission | Often argued as non-permanent fixture; potentially avoids planning permission |
| Reversibility | Permanent installation; removal costly and damages property | Removable system; can be taken away to restore property value upon sale |
| Installation Time | Several weeks (groundwork, curing time) | Days to 1-2 weeks |
| Typical Cost | £3,000-£8,000+ depending on length | £2,000-£6,000 depending on configuration |
To ensure your proposed works are fully compliant, safe, and eligible for funding, the next logical step is to seek a formal assessment. You should contact your local council to request an assessment from an Occupational Therapist, which is the statutory first step in the Disabled Facilities Grant process.