Making a home accessible is a critical financial decision that can either preserve or destroy your property’s value for your heirs; it is not merely about comfort.
- Highly specialised, irreversible adaptations like through-floor lifts can severely limit your buyer pool and negatively impact resale value.
- Universally desirable features like a well-executed ground-floor wet room can add value, but only if they meet strict UK Building Regulations.
Recommendation: Prioritise adaptations that are either easily reversible or universally appealing, and always secure specialist advice to avoid costly technical errors that could sabotage your investment.
You’re looking at your home, a place of memories, and thinking about the future. You need it to be safer, more accessible for yourself or a loved one. But as a UK homeowner, you’re also thinking of your children and your legacy. Will the changes you make today become a financial burden for them tomorrow? The internet is full of well-meaning advice: « Install a wet room! », « A stairlift is a must! ». But this advice rarely considers the cold, hard reality of the UK property market and the discerning eye of a future buyer.
As a surveyor, I see the costly mistakes homeowners make every day. They follow generic advice and end up with ‘improvements’ that can slash a property’s value by tens of thousands, or create problems that only a costly renovation can fix. This guide is different. We’re going to look at home adaptations with a commercially astute eye: what works, what backfires, and how to navigate the technical and financial minefield to protect your primary asset. It’s about balancing immediate needs with long-term financial prudence.
We’ll examine the surprising resale liability of a through-floor lift, the non-negotiable rules for a value-adding wet room, and the critical damp-proofing errors that plague Victorian home adaptations. This is the frank, commercially-driven advice you need to make informed decisions that serve you now and your heirs later.
Summary: Home Adaptations: A Surveyor’s Guide to Value vs. Liability
- Why installing a through-floor lift might limit your buyer pool in suburbia?
- How to convert a downstairs room into a wet room under Permitted Development rights?
- Trader or Specialist: who to hire for a ramp installation to avoid cowboy builders?
- The damp-proofing error that ruins ground floor adaptations in Victorian terraces
- In what order to renovate a 2-storey house to remain livable during works?
- How to apply for a Disabled Facilities Grant (DFG) without getting rejected?
- Why a Home-only alarm is useless for an active gardener?
- How to adapt a Victorian terraced house for accessibility on a budget?
Why installing a through-floor lift might limit your buyer pool in suburbia?
On paper, a through-floor lift seems like the ultimate accessibility solution. It’s a dramatic, modern intervention that solves the problem of stairs entirely. The marketing materials will promise a significant boost to your property’s value. However, from a surveyor’s perspective, this is one of the most financially risky adaptations a homeowner can make, particularly in a standard suburban family home. The primary issue is one of market appeal and reversibility. A young family looking for a three-bedroom house doesn’t see a convenience; they see a hole in the ceiling, a lost corner in their living room, and a feature they will never use.
This creates a significant resale liability. You are narrowing your potential buyers down to an extremely niche market that requires this specific feature. While a lift might be essential for you, it can be a major deterrent for 99% of the market. The cost of removal and making good the structure is a cost prospective buyers will mentally deduct from their offer. The financial reality is often stark; while some installations can add value in the right high-end property, homeowners may generally receive around 50% return on the lift installation cost upon selling. It’s a classic case of a high-cost, low-liquidity ‘improvement’.
Unless you are in a prime London apartment block where such features are expected, or you are certain the next buyer will have identical needs, a through-floor lift is more likely to be a financial negative than a positive. A high-quality, professionally installed stairlift is almost always a more commercially sensible choice, as it is far more easily and cheaply removed, restoring the home to a ‘standard’ layout for sale.
How to convert a downstairs room into a wet room under Permitted Development rights?
Converting a downstairs room—like a small study or part of a utility room—into a wet room is one of the most value-positive adaptations you can make. It’s universally desirable, appealing not just to those with mobility issues but also to families with children or pets. While the internal work itself often falls under Permitted Development rights (meaning you don’t need full planning permission), this does not mean it’s unregulated. To be an asset and not a liability, the conversion must strictly adhere to UK Building Regulations. Failure to do so can create serious issues with damp, ventilation, and electrical safety, which will be flagged on any pre-sale survey.
The complexity lies in the details that are often hidden behind the tiles. A surveyor will be looking for evidence of compliance with several key building regulations. These are not ‘nice-to-haves’; they are legal requirements designed to ensure the room is safe, functional, and won’t cause structural damage to your property. The drainage, in particular, is a point of frequent failure when installed by non-specialists.
As the image above suggests, the system is more than just a drain cover. It involves precise gradients, robust waterproofing (tanking), and correct integration with the property’s waste pipes. Getting this wrong leads to leaks, mould, and costly repairs. To ensure your investment adds value, you must ensure your installer is working to the following parts of the Building Regulations:
- Part A (Structural Safety): The floor, whether timber or concrete, must be assessed and potentially reinforced to support the new structure and prevent movement that could crack the waterproofing.
- Part F (Ventilation): A wet room is a high-humidity environment. Adequate ventilation is mandatory. Modern regulations favour continuous mechanical ventilation over simple intermittent fans to manage moisture and prevent mould growth. Extractors must be powerful enough, removing at least 15 litres of air per second.
- Part G (Water Supply): New pipework must be fitted with non-return valves to prevent contaminated water from siphoning back into your main water supply.
- Part H (Drainage): The gradient of the floor and the capacity of the drain and pipework are critical. The trap must have an adequate seal to prevent foul odours from entering the room.
- Part P (Electrical Safety): Safety is paramount. No mains voltage fittings are allowed within the wet zone. Lights must be correctly IP-rated and enclosed, and any switches must be pull-cords or located outside the room.
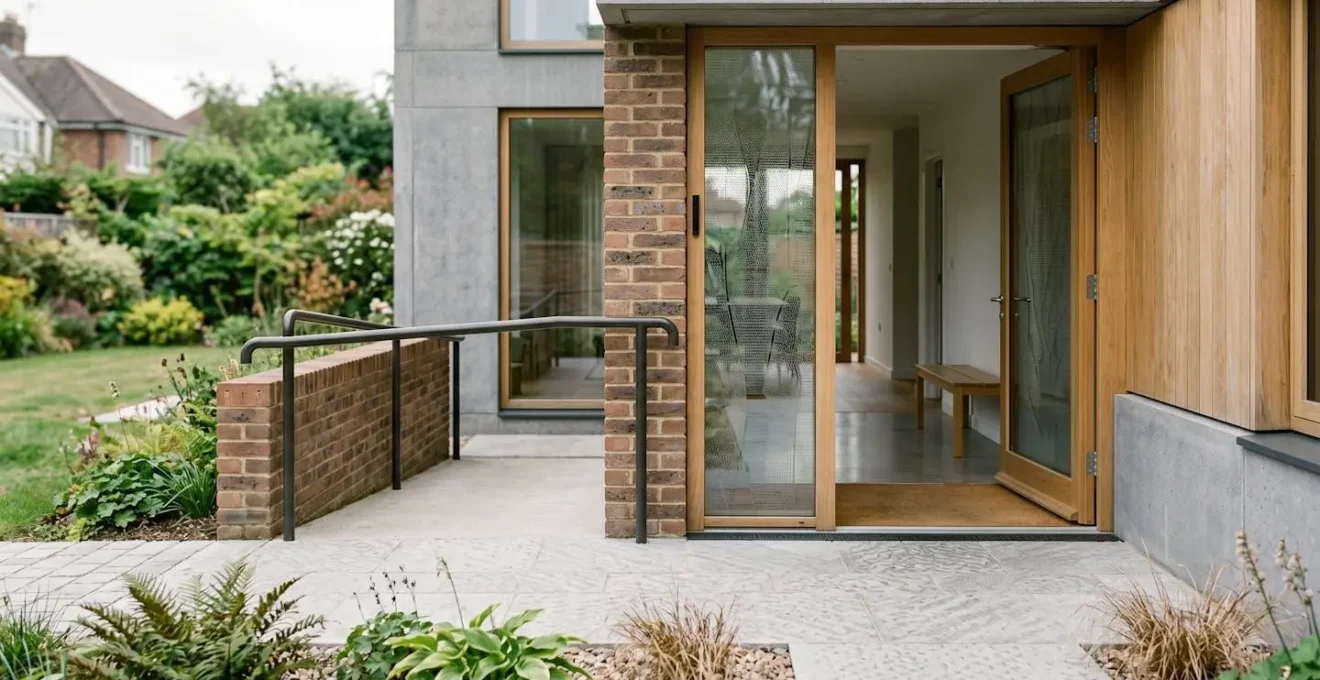
Trader or Specialist: who to hire for a ramp installation to avoid cowboy builders?
Installing an access ramp seems straightforward, but it’s one of the most common areas where homeowners fall victim to ‘cowboy builders’. A general builder or landscaper might offer a cheap quote, but they often lack the specialist knowledge required for a safe, compliant, and durable installation. The result can be a ramp that is dangerously steep, slippery, or, worst of all, channels water directly into the foundations of your house. Hiring the right person is not about finding the cheapest quote; it’s about mitigating long-term risk.
A specialist accessibility installer understands the nuances of Part M of the Building Regulations, which governs access to and use of buildings. They will know the correct gradients, the requirements for landings and turning circles, and the best non-slip materials for the unpredictable UK weather. A general trader often builds what ‘looks right’, which is rarely what is legally compliant or safe for the user. The difference between a trader and a specialist is the quality of their questions and their process.
Before you hire anyone, you must vet them. A slick website or a few good online reviews are not enough. You need to ask targeted questions that expose whether they are a true specialist or a generalist trying their luck. Use the following checklist as a non-negotiable part of your hiring process. A genuine specialist will have immediate, confident answers. A cowboy builder will likely become evasive or dismissive.
Your Pre-Hire Audit: 5 Questions to Expose Cowboy Ramp Installers
- Ask: ‘How will you manage drainage to prevent water running back towards the house and breaching the Damp Proof Course (DPC)?’ This is a critical question. The answer should involve a French drain, a channel drain, or ensuring the ramp level is below the DPC.
- Ask: ‘What gradient are you planning to use and does it comply with Part M of Building Regulations?’ They should be able to discuss ratios like 1:12 or 1:15 and justify their choice based on the ramp’s length.
- Ask: ‘What materials will you use for the surface to ensure it’s non-slip in wet UK weather?’ They should talk about specific products, not just ‘paving slabs’. Look for answers involving textured composite materials or treated timber with non-slip inserts.
- Request: Confirmation that they will obtain or work to an Occupational Therapist (OT) report. A professional process often starts with an OT assessment which provides the technical specifications for the user’s specific needs.
- Verify: Their registration with specialist accreditation bodies. Go beyond generic sites and ask for proof of membership with organisations like the British Healthcare Trades Association (BHTA) or that they are approved by Foundations, the national body for Home Improvement Agencies.
The damp-proofing error that ruins ground floor adaptations in Victorian terraces
Victorian terraced houses are the backbone of the UK’s housing stock, but they have a unique character that must be understood before any ground floor adaptations are made. Their construction is fundamentally different from modern homes; they were designed to ‘breathe’. The most common and costly error made during ground floor adaptations is inadvertently creating a ‘bridge’ across the original Damp Proof Course (DPC). This single mistake can introduce severe rising damp, leading to crumbling plaster, rotten timbers, and a problem that is extremely expensive to fix.
The DPC in a Victorian house is typically a layer of slate or engineering brick built into the wall about two brick courses above ground level. Its job is to stop moisture from the ground rising up through the porous bricks via capillary action. When a new structure, like a ramp, a patio, or a conservatory floor, is built up against the external wall at a level higher than this DPC, it creates a pathway for moisture to bypass the DPC and enter the wall. This is known as ‘bridging’.
Modern building practices using cement mortars and renders can also exacerbate the problem. As the detailed texture of the lime mortar in the image shows, old buildings need to breathe. Trapping moisture behind non-breathable modern materials is a recipe for disaster. The bricks become saturated, and salts are drawn to the internal plaster, causing the tell-tale blistering and decay. Many a homeowner has paid for a ground-floor extension only to spend thousands more a few years later on damp-proofing works that could have been avoided.
Case Study: The Bridged DPC in a Victorian Terrace
A common scenario seen by surveyors involves Victorian houses where, over many years, the external ground level (a garden or driveway) has been raised so it sits above the building’s original DPC. This renders the DPC completely ineffective. When an adaptation like a new concrete ramp is added without first addressing this, the problem is locked in. Moisture from the ground has an easy path directly into the brickwork above the DPC line. The correct solution is always to reduce the external ground levels to at least 150mm (two brick courses) below the DPC, or to install a physical gap, such as a French drain, between the new structure and the house wall.
In what order to renovate a 2-storey house to remain livable during works?
Undertaking major accessibility renovations while still living in the property is a significant challenge, requiring military-grade planning to avoid months of chaos. The key to success is not speed, but a strategic, phased approach that prioritises livability and containment. The goal is to always have a functional, clean, and safe area to retreat to. For a two-storey house being adapted for accessibility, this typically means adopting a ‘bottom-up’ strategy, but with a crucial preparatory step.
The standard renovation order of ‘fix the roof first’ is often subverted when accessibility is the primary driver. If the end-goal is to enable single-level living on the ground floor, then that area becomes the absolute priority. However, you can’t begin work there if it’s your only kitchen and living space. This is why establishing a temporary ‘sanctuary’ is the real first phase. This might be a spare bedroom upstairs equipped with a microwave, kettle, and mini-fridge, with guaranteed access to an existing bathroom. This zone is sealed off and remains untouched until the very end.
Once the sanctuary is established, the focus shifts to completing the entire ground floor. This is a disruptive process involving dust, noise, and the « big three » disconnections: water, electrics, and heating. A good contractor will plan these disconnections for short, specific periods, using temporary solutions like portable heaters to maintain comfort. Dust containment is not optional; it’s a critical health and sanity measure. Heavy-duty plastic sheeting with zipped access points and, ideally, negative air pressure machines are essential to stop fine dust from permeating the entire house. Only when the ground floor is 100% complete, clean, and functional should the final phase—renovating the original sanctuary zone—begin.
Here is a logical, phased approach to maintain livability:
- Phase 1 – Establish Sanctuary Zone: Before any demolition starts, identify and equip one room or area (often upstairs) that will remain a clean, functional living space with a temporary kitchenette and bathroom access throughout the entire project.
- Phase 2 – Complete Ground Floor First: For accessibility, the priority is to make the ground floor fully self-sufficient. Complete the wet room, bedroom conversion, and kitchen/living area adaptations first.
- Phase 3 – Manage Big Three Disruptions Sequentially: Plan for phased isolation and reconnection of water, electrics, and heating. Schedule this ‘utility downtime’ for periods when residents can temporarily vacate the house if possible.
- Phase 4 – Professional Dust Containment: Insist on professional-grade dust barriers. Create zipped plastic doorways and consider hiring negative air pressure machines to keep the sanctuary zone and completed areas clean.
- Phase 5 – Final Sanctuary Zone Completion: The last job on the list is to renovate the room you used as your sanctuary, ensuring you always have one fully operational and clean living space from start to finish.
How to apply for a Disabled Facilities Grant (DFG) without getting rejected?
The Disabled Facilities Grant (DFG) is a crucial source of funding for many homeowners, a means-tested grant from your local council to help pay for essential housing adaptations. However, the application process is notoriously bureaucratic and filled with pitfalls that lead to rejection. Success is not about simply filling in a form; it’s about understanding the council’s rigid criteria and following a precise, non-negotiable sequence of steps. The council’s primary obligations are to ensure the adaptation is ‘necessary and appropriate’ and ‘reasonable and practicable’. Your application must prove all four.
Funding is significant, with the maximum mandatory DFG available being £30,000 in England, £36,000 in Wales, and £35,000 in Northern Ireland. This level of funding means scrutiny is high. Furthermore, the system is under pressure; data from 73 English councils shows that collective spend on DFGs increased by over 33% in a decade, rising to over £100 million. To navigate this system, you must think like a council officer looking to approve a valid claim while rejecting ineligible ones.
The single biggest mistake is to get quotes or, even worse, start work before getting formal approval. This will almost certainly result in your application being rejected. The process must begin with a formal assessment by an Occupational Therapist (OT), arranged via your council’s social services. The OT’s report is the cornerstone of your application; without it, you have little chance of success. Understanding the means test is also vital. The grant is for those who cannot afford the adaptations themselves. If you have significant savings, you will be expected to contribute. The key is to follow the official process to the letter.
To avoid common rejection pitfalls, follow these steps meticulously:
- Step 1 – Obtain Occupational Therapist (OT) Assessment FIRST: This is non-negotiable. Contact your local council’s social services to arrange an OT assessment. An application submitted without a professional OT recommendation is highly likely to be rejected as not ‘necessary’.
- Step 2 – Understand the Means Test: Be realistic. The first £6,000 of savings is typically disregarded, but if you have substantial savings above this, you will likely be asked to contribute or may not qualify on financial grounds.
- Step 3 – Verify ‘Necessary’ vs ‘Reasonable’: The council is only obliged to fund the most basic, cost-effective solution. If the OT recommends a level-access shower, and you want a high-end luxury wet room, expect to pay the difference yourself.
- Step 4 – Never Start Work Before Approval: Do not begin any work, or even order materials, before you have written, formal approval of your application from the council. The process can take up to 6 months, and starting early will void your grant.
- Step 5 – Use Council-Approved or Vetted Contractors: Many councils maintain a list of approved contractors or will require multiple quotes. Submitting a single quote from your preferred builder is a common reason for technical rejection. Follow their procurement rules exactly.
Key takeaways
- Highly specialised, irreversible adaptations like through-floor lifts can act as a financial liability by deterring the general buyer market.
- Technical compliance is non-negotiable for value. A wet room or ramp that doesn’t meet UK Building Regulations is a defect, not an asset.
- Understanding your property’s specific character, especially the need for ‘breathability’ in older homes like Victorian terraces, is crucial to avoid creating expensive problems like damp.
Why a Home-only alarm is useless for an active gardener?
A personal alarm is a fantastic tool for peace of mind, but choosing the wrong type can render it completely ineffective for an active senior. The most common mistake is providing a standard, base-unit-linked ‘Home-only’ alarm to someone who loves spending time in their garden. These traditional systems work via a radio frequency (RF) pendant that communicates with a base unit plugged into a phone line inside the house. The problem is simple: the range is extremely limited.
The RF signal can be blocked by thick stone walls and will typically not reach the bottom of a standard UK garden. For an active gardener who might be out of sight at the back of the property, a fall or medical emergency could mean they are completely unable to call for help. Pressing the button on their pendant will do nothing if they are out of range of the base unit. This creates a dangerous false sense of security.
The solution for anyone who spends time outdoors—whether gardening, walking to a local shop, or visiting neighbours—is a GPS-enabled mobile alarm. These devices operate like a simple mobile phone, using the mobile network to connect to a monitoring centre from anywhere with a signal. They often include more advanced features like automatic fall detection, which can be a lifesaver if the user is rendered unconscious. For an active user, the choice is clear, as a direct comparison of the features demonstrates.
The following table breaks down the crucial differences between the two technologies from a practical, user-focused perspective.
| Feature | RF (Radio Frequency) Pendant | GPS-Enabled Mobile Alarm |
|---|---|---|
| Range | Only works near base unit (typically 50-100m max) | Works anywhere with mobile signal coverage |
| Garden Coverage | Useless at bottom of typical UK garden | Full coverage throughout property and garden |
| Fall Detection | Varies – often manual button press only | Often includes automatic fall detection technology |
| False Alarm Risk | High – easy accidental button press during gardening | Lower with fall detection – distinguishes actual falls from activity |
| Response Time | Dependent on base unit connection | Direct mobile network connection to monitoring centre |
| Best For | Indoor use only, sedentary users | Active seniors who garden, walk outdoors, or leave property |
How to adapt a Victorian terraced house for accessibility on a budget?
Adapting a period property like a Victorian terrace for accessibility can feel daunting, with costs quickly spiralling. However, not every effective adaptation requires a five-figure budget. By focusing on low-cost, high-impact interventions, it’s possible to dramatically improve safety and mobility without undertaking a full-scale renovation. The key is to prioritise changes that solve the most frequent and frustrating daily obstacles.
Often, the biggest barriers are the smallest in size. Awkward steps at thresholds between rooms, poor lighting in hallways, and the lack of a secure handhold at a critical point can be more limiting than a full flight of stairs. Addressing these issues first provides the greatest return in quality of life for the smallest financial outlay. It’s also crucial to exhaust all available public and charitable funding before spending your own money. Many people are unaware that local councils often provide a ‘minor adaptations’ service for free, or that numerous charities offer small grants for specific equipment.
Thinking creatively is also essential. While a brand-new stairlift is expensive, a professionally refurbished and installed second-hand model can offer the same functionality for a fraction of the price, provided it is safety-certified by a reputable company. The focus should be on a hierarchy of needs: first, eliminate immediate hazards; second, install aids for stability and movement; third, explore funding for larger equipment. This pragmatic approach can transform a challenging environment into a supportive one.
Here are five high-impact strategies to adapt a Victorian terrace on a tight budget:
- Priority 1 – Eliminate Thresholds: This is the single most effective budget adaptation. Focus on levelling the awkward lips and small steps between rooms and at external doors. This dramatically improves mobility for walker and wheelchair users and can often be done for a relatively low cost by a good joiner.
- Priority 2 – Professional Grab Rail Installation: Before you buy your own, contact your local council. Many provide a non-means-tested service for minor adaptations up to £1,000, which includes the professional assessment and installation of grab rails in crucial locations like bathrooms, hallways, and by the front door.
- Priority 3 – Improved Lighting and Contrast: Poor eyesight often accompanies mobility issues. Installing brighter, additional lighting, especially motion-sensor lights for night-time navigation, is a cheap and effective safety measure. Painting a high-contrast strip on the edge of steps also significantly improves visibility.
- Priority 4 – Explore Second-Hand Equipment Market: Consider professionally refurbished second-hand stairlifts. They can be significantly cheaper than new models. However, you must ALWAYS insist on a professional safety inspection and installation from a reputable specialist firm. Never attempt a DIY installation of used safety equipment.
- Priority 5 – Access Hidden Funding: Beyond the DFG, research smaller grants. Charities like local Age UK branches, SSAFA (for ex-service personnel), and various disability-specific charities (e.g., for MS or Parkinson’s) often have funds of £500-£2,000 available for specific adaptations or equipment.
Armed with this commercial and technical knowledge, your next step is to commission a professional assessment. A qualified surveyor or specialist Occupational Therapist can help you create an adaptation plan that meets your immediate needs without compromising your property’s future market value.